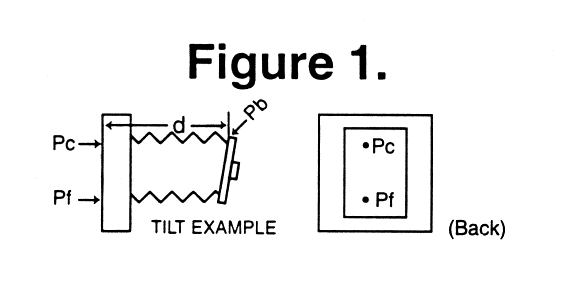
Imagine you are looking at the camera from behind. We could refer to the upper and lower points on the groundglass where the focusing targets for a tilt would be imaged. You can use either of these points to focus on and the other to check. I tend to focus on the one that is harder to see and check the one that has finer detail or better contrast. Similarly, we could refer to the left and right points on the groundglass where focusing targets for a swing would be imaged. Again, either of them can be chosen for focusing and the other for checking. In all cases, the distance from the point used for checking to the corresponding edge of the lensboard is defined as d.
As an example (See Figure 1) suppose the back of the camera is tilted away from the lens according to an informed estimate (6.) and two focusing targets in the plane to be made sharp have been chosen (7.). Furthermore, the lower target image point on the groundglass has been selected for focusing (call it Pf), and the upper one for checking (call it Pc). Then d is the distance from Pc to the top edge of the Iensboard.

Focus on Pf, and for the first check at Pc, tweak in whichever direction you wish. Suppose your first check decreases d by moving the top of the lensboard and the top of the groundglass closer together. If the image at Pc gets sharper, you should incorporate the decrease of d into the tilt by removing some of the tilt. Focus/Check again, tweaking in the same direction because the last direction was beneficial. Suppose the image gets a little sharper and then gets fuzzier during the last part of the tweak. That indicates the direction was helpful and you are nearly correct. Decrease d slightly by removing a very small amount of tilt. Focus/Check again, tweaking in the same direction. Suppose the image immediately gets fuzzier. This would happen if the tilt is exactly right or if you removed too much tilt the last time you adjusted it. To find out which is the case, don't change d (because the tilt might be correct) but do a Focus/Check, tweaking in the opposite direction. If the image gets fuzzier, the tilt is correct and you are finished. If it gets sharper before getting fuzzier, your last tilt adjustment removed too much and you need to increase d by slightly increasing the tilt. You will learn to judge the magnitude of changes needed by noting how image sharpness changes as you tweak the focus knob.
It will soon become apparent that changes of tilt or swing must be very slight as you near convergence. With many view cameras, these adjustments can be made much more accurately if you will come out from under the dark cloth and look at the camera piece you are moving. This also makes it easier to see whether d increases or decreases during a check and to decide whether more or less swing or tilt is needed. Resist the temptation to try to do everything by feel while looking at the groundglass. After manipulating various view cameras for decades, if a movement isn't easy to control, I still come out from under the dark cloth and watch while adjusting it.
After tweaking the focus knob for a check, many students seem to have an uncontrollable urge to turn the knob again in the opposite direction (while still looking at Pc). Since Pf is now out of focus, nothing more can be learned, so use the information provided by the initial tweak to modify d, and start a new Focus/Check. There is never any reason to turn the knob in two directions while watching Pc.
If the horizontal axis about which the back of the camera pivots during a tilt coincides with the center of the groundglass (or somewhat lower, as with certain monorail cameras) and if one can manage to have the image of one of the focusing targets fall on this axis, marvellous efficiency is possible. The distant target is focused at the axis with the focus knob and it stays in focus while the near target (whose image is higher on the groundglass) is brought into focus simply by tilting the back. Some owners of cameras that pivot on an axis at the base of the back, below the ground glass, try to operate this way. They focus on the lower target image point and then tilt the back until the upper point is in focus. However, since the lower point isn't on the axis, it goes somewhat out of focus during the tilt. This procedure could be used as an initial estimate of the tilt needed, but the Scheimpflug principle might provide a closer one.
Focus/Check is useful for all types of view cameras, but two types of camera construction restrict the choice of which point on the groundglass to use for Pf and which for Pc. If the tilt being used pivots at the base, use the focusing target point closest to the base for Pf and the higher one for Pc. This allows needed changes in d to be applied directly to the tilt. Similarly, some wooden Japanese cameras accomplish swings by holding one side still and flexing a strut to move the other side. In this case, choose for Pf the point closest to the side that doesn't move.
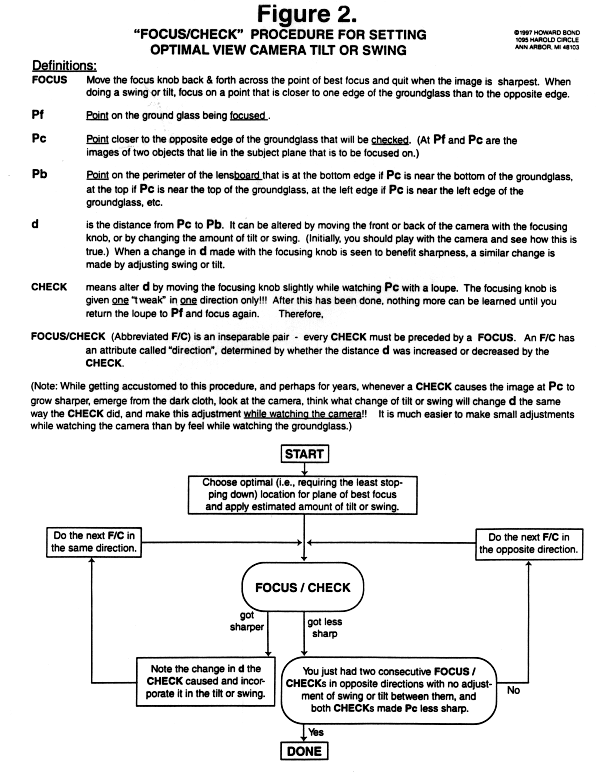
Although Focus/Check is simple when applied to a specific example, many words are needed to describe it, as the above example demonstrated. Attempts to state the procedure in a general way that covers both swings and tilts simultaneously quickly become ponderous and confusing. Therefore, my general presentation is in the form of a flow chart that works for both movements. See Figure 2 . I recommend practicing with the camera and flow chart to become more familiar with Focus/Check.

9. CHOOSE THE LARGEST APERTURE THAT WILL PROVIDE ADEQUATE DEPTH OF FIELD. Typically, some parts of the subject project away from the plane of focus. After focusing, choose the fuzziest of these, ideally a bright one, and watch the image with a loupe while slowly stopping down until it looks sharp. If the negative will be enlarged a lot, stop down another stop, if you can do so without unacceptable diffraction loss. If it does seem that diffraction will be a problem, review the location of the plane of focus and see if a better orientation (one that requires less depth of field) could be chosen. Or, it might pay to explore minor variations in the composition or camera position that might have less severe depth of field requirements. When the aperture needed for depth of field would incur an undesirable diffraction loss, it is well to remember that insufficient depth of field is likely to be obvious, while the overall degradation caused by dffraction is usually subtle. Therefore, I give priority to depth of field.
10. RETURN THE CAMERA MOVEMENTS TO NEUTRAL. If you put away your camera with some swing on it, and its next use is for a photograph of your high school class at its 30th anniversary reunion, people in the middle of the front row will be in focus, while those at the ends will be soft. This will make you feel very bad! Please don't ask how I know that.
Throughout the presentation of this checklist, there was an unstated assumption that you would use either a swing or a tilt. Consider the possibility that you might need both movements for the same photograph. Suppose a subject is low where it is close to the camera and high farther away. Also, the subject is close to the camera on the right and farther away on the left. This calls for an oblique plane of focus, tipped away from the camera and also rotated. This can be achieved by using both a tilt and a swing, applied sequentially. It doesn't matter which is done first.
For an example that is easy to describe, assume that a tilt and a swing are to be done at the back of the camera, with the tilt to be applied first. Choose two focusing targets in the desired plane whose images will lie one above the other on the groundglass. Estimate the tilt and then perform the Focus/Check procedure as though the tilt were the only movement needed. Next, do the estimate and Focus/Check for the swing. You can ignore the fact that a tilt has already been done, except for one requirement. Because the top and bottom of the groundglass are now different distances from the lens, Pf and Pc for the swing must be the same distance from the top of the groundglass. This is easy to arrange if your groundglass has grid lines - just have Pf and Pc on or near one of the horizontal grid lines.
If the swing had been applied first, the right and left sides of the groundglass would be different distances from the lens when you got ready to do the tilt. This would require the Pf and Pc for the tilt to be the same distance from the left edge of the groundglass (i.e., on the same vertical grid line). Rear swing and tilt were used for this example because this allowed me to talk in terms of distance from the lens. Combining a swing and a tilt works equally well if one or both adjustments are made at the front. Just be sure the focusing points for the second movement lie on the same grid line. If your groundglass lacks grid lines, draw them on the side toward the lens with a pencil and T-square.
Apparently, the simultaneous use of a swing and a tilt, with the Scheimpflug principle guiding the choice of initial estimates, seems rather daunting to some people. After a view camera workshop, one participant wrote that he had just done a "double Scheimpflug without a safety net" !
In summary
- Use a composing card.
- Level the camera.
- Focus very roughly.
- Use shifts to point the camera.
- Choose the best location for the plane of focus.
- Make an informed estimate of the amount of tilt or swing needed.
- Choose two focusing targets.
- Use the Focus/Check procedure to perfect the tilt or swing.
- Choose the largest aperture that will provide adequate depth of field.
- Return the camera movements to neutral.